
SilkCentral’s Upload Manager offers a convenient means of uploading files—typically screen captures, text files, or test scripts—directly to existing issues in your Issue Manager database, or to serve as the basis for new issues.
Upload Manager can also be employed to upload files to the SilkCentral file pool where files are accessible to Test Manager. For information about uploading files to the SilkCentral file pool, please see “Uploading a file to the SilkCentral file pool”.
Upload Manager can be accessed in one of two ways:
• By launching its executable from the program directory to which it has been installed (e.g., ...<Test Manager>/Upload Manager/UploadManager.exe).
• Via a hotkey keyboard combination (e.g., Ctrl+Print Screen). This option is enabled after configuring SnagIt, as explained in “Configuring SnagIt”).
Downloading Upload Manager
Upload Manager is available for download via SilkCentral’s client Tools page. Once downloaded to your local system, Upload Manager can be launched directly as a standalone .exe—independent of SilkCentral.
Procedure To download and launch Upload Manager:
1 Go to Help/Tools and click the Upload Manager link.
2 Using your browser’s download dialog, save the UploadManager.exe file to your local system.
3 Double-click the UploadManager.exe file to launch the InstallShield Wizard for Upload Manager.
4 Follow along with the InstallShield Wizard’s prompts, entering your name, company name, and target destination for the installation. Click the Finish button to complete the installation.
SnagIt screen capture integration
With Issue Manager’s integration with TechSmith’s SnagIt screen capture utility, you can capture screen images of error conditions and attach the images (via Upload Manager) directly to issues in Issue Manager’s database. Screen captures can be invaluable in explaining and reproducing error conditions.
You must configure SnagIt before you can upload SnagIt screen captures and attach them to Issue Manager issues.
Note To purchase SnagIt, or
to learn more about SnagIt’s functionality, please visit the TechSmith
Website:
http://www.techsmith.com.
Note The following procedure was tested with SnagIt 8.2.2.
Procedure To configure SnagIt for use with Issue Manager:
1 Launch SnagIt from your program directory (Start/All Programs/SnagIt).
2 Click the New Profile Wizard button on the toolbar in SnagIt Profiles view.

3 Select Image capture mode (if not selected already).
4 Click Next.

5 Select Window as the input type (if not already selected).
6 Click Next.

7 Select Program from the Output drop-down list.
8 Deselect the Preview Window menu option.
9 Click the Properties button.

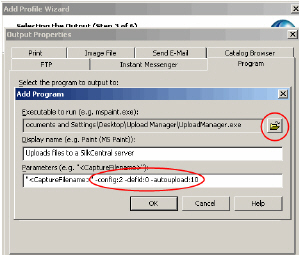
10 On the Output Properties dialog, click the Add button.

11 On the Add
Program dialog, browse to and select the UploadManager.exe
file on your local system
(e.g., <Test Manager>\Upload Manager\UploadManager.exe).
12 Extend
the command line parameters by inserting the following string:
-config:2 -defid:0 -autoupload:10
Note See “Upload Manager commandline options” for other commandline options.
13 Click OK.
14 Back on the Add Profile Wizard dialog, click Next to advance to Step 4 of 6. Click Next to accept the default setting.

15 For Step 5 of 6, click Next to accept the default setting.

16 Give your Upload Manager profile a name (e.g., Upload Manager) and specify a hotkey combination for launching Upload Manager (e.g., Ctrl+Print Screen).
17 Click Finish.

18 The Upload Manager profile is now added to your personal SnagIt profiles and you have successfully configured SnagIt for use with SilkCentral.

Procedure To capture an image with SnagIt:
1 After you have configured SnagIt for use with SilkCentral (as explained in the previous section), enter your hotkey keyboard combination (e.g., Ctrl+Print Screen) to launch SnagIt.
2 Click SnagIt’s Capture button to capture a screengrab.
3 Click the Finish (Program) button on SnagIt’s toolbar.
4 Upload Manager will now launch, enabling you to upload the screen capture where it can be used either as the basis of a new issue in your SilkCentral Issue Manager database or it can be attached to an existing issue. See the following section “Uploading a file to Issue Manager” for details.
Note For more details on use
of the SnagIt screen capture utility, please refer to SnagIt documentation,
or visit the TechSmith Website:
http://www.techsmith.com.
Uploading a file to Issue Manager
Procedure To upload a screen capture (or other file) to Issue Manager:
1 Launch Upload Manager by either clicking the application’s executable file (UploadManager.exe) or via SnagIt (by entering the hotkey keyboard combination you have configured, as explained in the previous section).
2 On the Select Target Location dialog, select the option to upload the file to SilkCentral Issue Manager 4.0.1 or higher.
3 Click Next.

4 Click the Add button (unless the file you wish to upload is already visible in the Filename field) to browse to and select the file that you want to upload (e.g., a screen capture).
5 Once the file that you want to upload appears in the Filename field, click Next.

6 Enter the connection parameters for your SilkCentral installation, beginning with the Hostname of the computer that hosts your Issue Manager installation (note that the name should not include a protocol designation).
7 Enter the installation’s Port.
8 Select the Secure checkbox if the connection is secured (i.e., HTTPS).
9 Enter the Username and Password login credentials that are required for your SilkCentral server.
10 (Optional) Click the Set as Default button to have these parameters suggested to you automatically the next time you run Upload Manager.
11 (Optional) Click the Internet Options button to configure Internet settings for your connection (e.g., proxy server settings).
12 Click Next.

13 Select the Issue Manager project to which you want to upload this file.

15 At this point you can either create a New Issue to which the file will be uploaded or you can upload the file to an existing issue.
Note Typically users take screen captures when issues are first discovered (this is what makes Issue Manager’s integration with SnagIt so powerful). In such cases, the New Issue option is the appropriate selection. For details on uploading a file for attachment to an existing issue, see “Uploading a file to an existing issue”.
16 Click Next.

17 Enter a description of the file that is to be uploaded in the Specify file description field.
18 Click Next.

19 Verify all of the information you have entered in the Upload files field. Click the Back button if you need to make any changes.
20 Accept the default checkbox setting for the Close this window when the upload is complete checkbox.
21 Click Finish to begin the upload process.

22 Issue Manager launches within your browser when the upload is complete and a new issue is created automatically—with the uploaded file attached. Select pre-configured values from the drop-down lists that are high-lighted in yellow to define the newly created issue.
23 Click the Description tab to enter a Synopsis and Description of the new issue.
24 Click OK to save your new issue to the Issue Manager database. The issue will be assigned an issue number and routed to the appropriate recipient (based on your system’s defined workflow).

Uploading a file to an existing issue
Procedure To upload a file (e.g., a screen capture) to an existing issue:
1 Complete steps 1 thru 14 outlined in the previous section, “Uploading a file to Issue Manager”.
2 On the Select an issue screen, select the Existing issue radio button.
3 Enter the issue ID of the issue you want the file to be uploaded to in the Issue ID field.
4 Click the Check button to verify details of the specified issue (in the field below).
5 Click Next and proceed with step 17 in the previous section, “Uploading a file to Issue Manager”.

Note When you upload a file to an existing issue, the file is added to the issue’s Attached Files tab.
Uploading a file to the SilkCentral file pool
Procedure To upload a file to the SilkCentral file pool:
1 Launch Upload Manager by clicking the application’s executable file (UploadManager.exe).
2 On the Select Target Location dialog, select the option to upload the file to the SilkCentral (server file pool).
3 Click Next.

4 Click the Add button (unless the file you wish to upload is already visible in the Filename field) to browse to and select the file that you want to upload.
Note It is not possible to add file descriptions when uploading files to the file pool.
5 Once the file that you want to upload appears in the Filename field, click Next.

6 Enter the connection parameters for your SilkCentral installation, beginning with the Hostname of the computer that hosts your Issue Manager installation (note that the name should not include a protocol designation).
7 Enter the installation’s Port.
8 Select the Secure checkbox if the connection is secured (i.e., HTTPS).
9 Enter the Username and Password login credentials that are required for your SilkCentral server.
10 (Optional) Click the Set as Default button to have these parameters suggested to you automatically the next time you run Upload Manager.
11 (Optional) Click the Internet Options button to configure Internet settings for your connection (e.g., proxy server settings).
12 Click Next.

13 Verify all of the information you have entered in the Upload files field. Click the Back button if you need to make any changes.
14 Accept the default checkbox setting for the Close this window when the upload is complete checkbox.
15 Click Finish to begin the upload process. When the upload is complete, Upload Manager will close and the uploaded file will be available in SilkCentral’s file pool.

Upload Manager commandline options
As demonstrated in the “Configuring SnagIt” section of this chapter, Upload Manager’s settings can be defined via commandline options. Defining commandline options optimizes SnagIt’s integration with SilkCentral by automating formatting and configuration operations that you would otherwise have to execute manually with each file upload.
Note Settings configured via command line options override any conflicting settings that may have been manually configured via the SnagIt GUI.
Commandline options can either be inserted during initial SnagIt configuration (as shown in step 12 of the “Configuring SnagIt” section of this chapter) or they can be inserted later.
Here is the format that is to be followed when constructing commandline options: schupIt.exe {options} {UploadFileNameList}
The order in which option settings are listed does not affect application behavior. Option parsing is not case-sensitive. Option parameters must not be separated by blank spaces.
The following command line options are supported by Upload Manager:
HOSTNAME:<HostName>
e.g., HOSTNAME:tm.silk.com
The target server (notice that the server name is not preceded by a protocol)
USERNAME:<UserName>
e.g., USERNAME:admin
The user name to be used for server login
PASSWORD:<Password>
e.g., PASSWORD:secret
The password to be used for server login
PORT:<PortNo>
e.g., PORT:19120
The targeted server port. 80 is the default http:// port. 443 is the default https:// port. 19120 is the default test server port.
SECURE:<0 or 1>
e.g., SECURE:1
For https://myhost:myport/
connections:
- 0 sets a standard HTTP connection
- 1 sets a secure HTTPS connection
CONFIG:<ConfigurationId>
e.g., CONFIG:2
The configuration ID of the targeted server, used for uploading files
to Issue Manager and SilkCentral:
- 2 is used for uploading files
to Issue Manager
- 3 is used for uploading files
to the SilkCentral server file pool
PROJECT:<ProjectId>
e.g., PROJECT:0
0 is the default Demo Project in Issue Manager.
Note To identify an Issue Manager project’s ID#, pass your cursor over an active project name on the Issue Manager Projects page. Then look for the following string in your browser’s status bar: imPrj=<project ID #>.
DEFID:<DefectId>
e.g., DEFID:156
This is used to attach a file to a specific Issue Manager issue (in this case, issue #156). 0 is used to create a new issue.
DESC:<AttachmentFileDescription>
e.g., DESC:Screen Shot Attachment
This defines a file description (Issue Manager only).
AUTOCLOSE
Selects the Upload Manager dialog checkbox that instructs Upload Manager to close after it successfully completes an upload.
AUTOUPLOAD:<WizardStepIndex>
e.g., AUTOUPLOAD:10
This instructs Upload Manager to attempt automatic file upload up through a specified wizard step (WizardStepIndex). Upload Manager then prompts the user for manual input at the following wizard step. Automatic file upload will stop at any step within which a configuration failure is detected.
VERBOSE
This option causes a dialog to be presented if a dependent component is missing (e.g., if a SilkPerformer compiler is unavailable when a SilkPerformer project is to be uploaded to SilkCentral).
<UploadFileNameList>
e.g., C:\TEMP\MyScreenShot.jpg
Such paths can be used when uploading multiple files to the SilkCentral file pool. Any parameter passed to Upload Manager that is not preceded by a dash (-) is recognized as an absolute file path.
Example commandline configuration
An example of commandline option usage is shown in step 12 of the “Configuring SnagIt” section of this chapter. This example specifies the following:
(-autoupload:10) Autostep through the wizard steps until the Upload Manager wizard page showing the settings summary and upload progress appears.
(-config:2) Issue Manager configuration
(-defid:0) Create a new issue within the preset Issue Manager project on the preset Issue Manager server
Note For more commandline options, see your Windows manual or search the MSDN library.